Testing Bluetooth Low Energy Application with BleuIO and Jest
August 1, 2023
Bluetooth Low Energy (BLE) has become a popular technology for creating wireless communication between devices with low power consumption. When developing BLE applications, it’s essential to thoroughly test them to ensure they work correctly. This tutorial shows a basic test script that determines the role of a Bluetooth Low Energy (BLE) device and passes the test based on the device role. The test script utilizes the BleuIO Bluetooth Low Energy USB dongle along with a JavaScript Testing Framework. You can modify this script according to your specific needs for testing BLE applications.. We’ll communicate with the dongle using Node SerialPort, write AT commands, and read back responses from the dongle.
Prerequisites
Before we start, make sure you have the following:
- BleuIO Bluetooth Low Energy USB dongle.
- Node.js and npm installed on your computer.
- Basic knowledge of JavaScript and testing concepts.
Setting Up the Environment
First, connect the BleuIO dongle to your computer. To find the path of the dongle, open your terminal and run the following command:
ls /dev/cu.*
Note down the path of the dongle (e.g., /dev/cu.usbmodem4048FDE6EBCB1).
Next, create a new directory for your project and initialize a Node.js project by running:
npm init -y
Now, install the required packages: SerialPort and Jest.
npm install serialport
npm install --save-dev jest
Writing the Role Check Function
Create a new file rolecheck.js and paste the following code:
import { SerialPort } from 'serialport';

const dongleReadWrite = () => {
  return new Promise((resolve) => {
    let readDataArray = [];
    const port = new SerialPort({
      path: '/dev/cu.usbmodem4048FDE6EBCB1', // Replace this with your dongle's path
      baudRate: 115200,
      dataBits: 8,
      parity: 'none',
      stopBits: 1,
    });

    // Function to write data to the dongle
    const writeData = async (cmd) => {
      port.on('open', () => {
        port.write(cmd + '\r\n', (err) => {
          if (err) {
            return console.log('Error writing data: ', err.message);
          }
        });
      });
    };

    // Function to read data from the dongle
    const readData = () => {
      return new Promise(function (resolve, reject) {
        port.on('readable', () => {
          let data = port.read();
          let enc = new TextDecoder();
          let arr = new Uint8Array(data);
          arr = enc.decode(arr);
          let removeRn = arr.replace(/\r?\n|\r/gm, '');
          if (removeRn != null) readDataArray.push(removeRn);
          return resolve(readDataArray);
        });
      });
    };

    // Write the command 'AT+GAPSTATUS' to the dongle
    writeData('AT+GAPSTATUS');

    // Read the response from the dongle after a delay of 1 second
    readData().then((data) => {
      setTimeout(() => {
        port.close();
        return resolve(data);
      }, 1000);
    });
  });
};

// Function to get the role of the dongle
export const getRole = () => {
  return new Promise((resolve) => {
    // Call dongleReadWrite() to fetch data from the dongle
    dongleReadWrite().then((data) => {
      const regex = /(Peripheral|Central)/i;
      // Find the role from the response data using regular expression
      const roleMatch = data.find((element) => regex.test(element));
      // Extract the role ('Peripheral' or 'Central') from the match
      const role = roleMatch ? roleMatch.match(regex)[0] : null;
      // Return the role to the caller
      return resolve(role);
    });
  });
};
The getRole() function connects to the dongle and writes the command AT+GAPSTATUS to find out the role. The response we get is an array, which looks like this
[ ‘AT+GAPSTATUS’, ‘Peripheral roleNot ConnectedNot Advertising’ ]
we extract the role information from it.
Writing the Test Script
Create another file rolecheck.test.js and paste the following code:
import { getRole } from './rolecheck';
import { jest } from '@jest/globals';
jest.useFakeTimers();

test('Get peripheral role', async () => {
  const dataPromise = getRole(); // Start the data fetching process

  jest.advanceTimersByTime(1000); // Advance the timer by 1 second

  // At this point, the timer has advanced by 1 second, but the data is not resolved yet
  // We can check that the dataPromise is still pending
  expect(dataPromise).toBeInstanceOf(Promise);

  jest.advanceTimersByTime(2000); // Advance the timer by another 2 seconds to complete the 3 seconds

  // Now, the data should be resolved, and the test should pass if the role is 'Peripheral'
  expect(dataPromise).resolves.toBe('Peripheral');
});
In the test script, we import the getRole() function from rolecheck.js. We use Jest’s fake timers to control the asynchronous flow and mimic the behavior of asynchronous code.
The test checks whether the role obtained from the getRole() function is 'Peripheral'. If it is, the test passes; otherwise, it fails.
Running the Test
To execute the test, run the following command in the terminal:
npm test
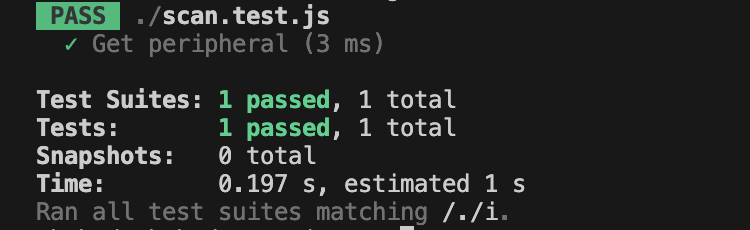
Jest will run the test, and you should see the test results on your terminal.
The response will look like this
Conclusion
In this tutorial, we explored how to communicate with the BleuIO dongle, write AT commands, and read back responses using a JavaScript Testing Framework (Jest). With the right testing approach, you can ensure the stability and correctness of your BLE application before deploying it to production. Happy testing!