Building BLE web application with Python Flask and BleuIO
January 16, 2024
Bluetooth Low Energy (BLE) is a powerful technology for connecting devices wirelessly, and developing applications for BLE devices can be both exciting and challenging. In this tutorial, we’ll explore how to create a simple BLE device scanner using Python, Flask, and the BleuIO USB dongle. The BleuIO dongle provides a convenient interface through AT commands, allowing developers to easily interact with BLE devices.
Prerequisites
Before we dive into the tutorial, make sure you have the following:
- BleuIO USB dongle
- Python installed on your machine
- Flask installed (
pip install flask)
Setting Up the Flask App
Let’s start by examining the Python Flask code provided in app.py. This code defines a Flask web application with two routes: the home route (/) and a route to run the BLE device scan (/run_scan). The app uses the serial library to communicate with the BleuIO dongle over the serial port.
from flask import Flask, render_template, request
import serial
import time

app = Flask(__name__)

def scan_ble_devices():
    connecting_to_dongle = 0
    print("Connecting to dongle...")

    while connecting_to_dongle == 0:
        try:
            console = serial.Serial(
                port='/dev/cu.usbmodem4048FDE52DAF1',
                baudrate=57600,
                parity="N",
                stopbits=1,
                bytesize=8,
                timeout=0
            )
            if console.is_open.__bool__():
                connecting_to_dongle = 1
        except:
            print("Dongle not connected. Please reconnect Dongle.")
            time.sleep(5)

    console.write(str.encode("AT+CENTRAL"))
    console.write('\r'.encode())
    time.sleep(0.1)
    console.write(str.encode("AT+GAPSCAN=2"))
    console.write('\r'.encode())
    time.sleep(3)
    json_responses = []

    while console.inWaiting() > 0:
        line = console.readline().decode().strip()
        print(line)
        if line.startswith('['):
            json_responses.append(line)

    console.close()
    return json_responses

@app.route('/')
def home():
    return render_template('index.html')

@app.route('/run_scan', methods=['POST'])
def run_scan():
    if request.method == 'POST':
        json_responses = scan_ble_devices()

        return render_template('index.html', json_responses=json_responses)

if __name__ == '__main__':
    app.run(debug=True,port=5001)
HTML Template (index.html)
The HTML template (index.html) defines a simple web page with a button to trigger the BLE device scan. The page displays the results of the scan in an unordered list. Make sure the index.html file should stay inside template folder. so the folder structure should be like this
├── app.py
└── templates
    └── index.html
Code for index.html is provided below
<!DOCTYPE html>
<html lang="en">
<head>
<meta charset="UTF-8" />
<meta name="viewport" content="width=device-width, initial-scale=1.0" />
<title>Flask BLE Device Scanner</title>
<link
href="//cdn.muicss.com/mui-0.10.3/css/mui.min.css"
rel="stylesheet"
type="text/css"
/>
</head>
<body>
<div class="mui-container">
<br /><br />
<div class="mui-panel">
<img
src="https://flask.palletsprojects.com/en/3.0.x/_images/flask-horizontal.png"
alt=""
height="100"
/>
<img
src="https://1000logos.net/wp-content/uploads/2020/08/Python-Logo.png"
alt=""
height="100"
/>
<h1>Hello, Python BLE programmer!</h1>
<p>
This is a simple web page created with Flask to interact with BLE
devices nearby.
</p>
<form action="/run_scan" method="post">
<button
type="submit"
class="mui-btn mui-btn--primary mui-btn--raised"
>
Scan for BLE Devices
</button>
</form>
<br />
{% if json_responses %}
<ul class="mui-list--unstyled">
{% for json_response in json_responses %}
<li style="margin-bottom: 10px">
✓ {{ json_response | safe }}
</li>
{% endfor %}
</ul>
{% endif %}
</div>
</div>
</body>
</html>
Explaining the Code
Let’s dive into the connection part of the code and explain how the serial port is specified and why it is essential.
console = serial.Serial(
    port='/dev/cu.usbmodem4048FDE52DAF1',
    baudrate=57600,
    parity="N",
    stopbits=1,
    bytesize=8,
    timeout=0
)
In this code snippet, the serial.Serial function is used to create a serial port object (console) for communication with the BleuIO dongle. Let’s break down the parameters used in this function:
port: Specifies the name or address of the port to which the BleuIO dongle is connected. In this case, it is set to'/dev/cu.usbmodem4048FDE52DAF1'.
On macOS,/dev/cu.*represents serial ports, and by runningls /dev/cu.*in the terminal, you can see a list of connected devices. The specific port for the BleuIO dongle is copied from this list and pasted into the code.

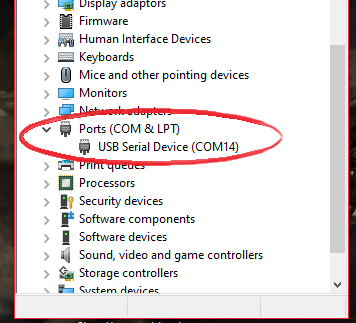
For windows the COM port information can be found here. Here the path for the dongle is COM14
baudrate: Sets the baud rate for communication. The BleuIO dongle communicates at a baud rate of 57600, so it is set accordingly.parity: Specifies the parity checking scheme. In this case, it is set to “N” for no parity.stopbits: Defines the number of stop bits. It is set to 1, which is a common configuration.bytesize: Sets the number of data bits. It is set to 8, which is standard for most serial communication.timeout: Sets the timeout for read operations. It is set to 0, meaning no timeout, allowing the code to wait indefinitely for responses from the BleuIO dongle.
It’s crucial to accurately specify the port to establish a successful connection between the Flask application and the BleuIO dongle. Incorrect port information will result in a failure to establish communication.
- Connecting to BleuIO Dongle: The
scan_ble_devicesfunction attempts to establish a connection with the BleuIO dongle over the serial port. It retries until the connection is successful. - Sending AT Commands: The function sends specific AT commands to the dongle to set it in central mode (
AT+CENTRAL) and initiate a BLE device scan for two seconds (AT+GAPSCAN=2). - Parsing JSON Responses: The function reads and parses the JSON responses received from the dongle. It collects the responses in a list (
json_responses). - Flask Routes: The Flask app has two routes – the home route (
/) renders theindex.htmltemplate, and the/run_scanroute triggers the BLE device scan and displays the results
To run the script simply run the following code on the terminal.
python app.py
Output
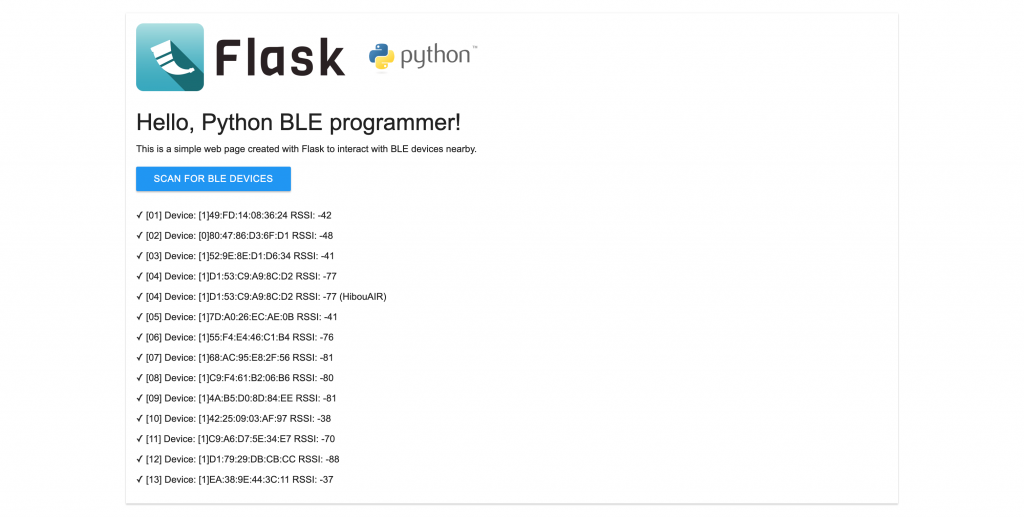
In this tutorial, we’ve explored how to create a simple BLE device scanner using Python, Flask, and the BleuIO USB dongle. The combination of Flask and BleuIO’s AT commands provides a straightforward way for Python developers to interact with BLE devices, making BLE application development more accessible and efficient. You can further extend this project by adding features like connecting to specific BLE devices, reading characteristics, or even controlling devices.
Details of the AT commands available on the BleuIO documentation.
To get started, make sure to have your BleuIO dongle, install Flask, and run the provided Python script. Happy BLE programming!