BLE device presence detection : How to scan and filter devices by RSSI using BleuIO
August 21, 2024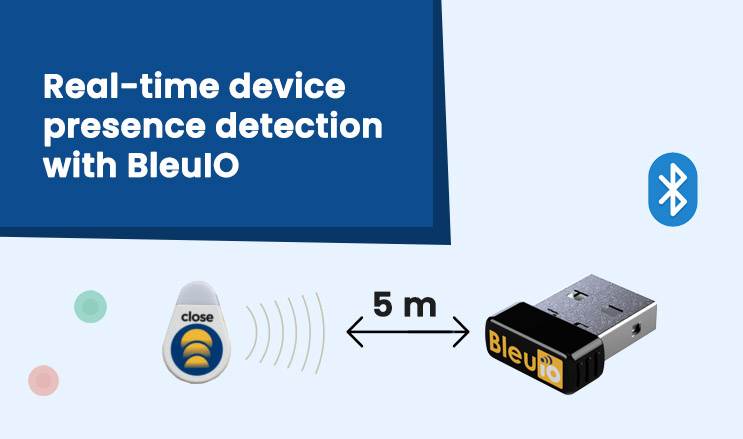
In this tutorial, we’ll guide you through creating a project that scans for nearby Bluetooth Low Energy (BLE) devices, filters them based on RSSI (Received Signal Strength Indicator), and determines if a specific device, the Close Beacon, is within a certain range. We’ll use the BleuIO USB dongle, which simplifies BLE development through its easy-to-use AT commands. By the end of this tutorial, you’ll have a working BLE scanner that can identify when the Close Beacon is within approximately 5 meters.
Overview of the Project
The goal of this project is to continuously scan for nearby BLE devices and check if a particular device, identified by its name (“Close beacon”), is within a defined range. We determine the range by setting an RSSI filter, which allows us to estimate the distance based on signal strength. If the device is found within this range, it is considered “online”; otherwise, it is “offline”.
Hardware Used
- BleuIO USB Dongle: A BLE USB dongle that makes it easy to create BLE applications, prototypes, or test devices with AT commands and available libraries for Python and JavaScript.
- Close Beacon: A BLE beacon device that broadcasts its presence to nearby BLE scanners. This hardware will be our target device to identify if it’s within a 5-meter range based on its RSSI.
Use Cases
- Proximity Detection: Identify if a specific BLE device (e.g., a beacon or wearable) is within a set distance from the scanner.
- Asset Tracking: Monitor the presence of assets in a particular area based on their BLE signal strength.
- Environment Monitoring: Set up zones where certain devices must be present and get notified if they leave the range.
Getting Started with BleuIO
Before diving into the code, let’s cover the basic setup:
- Hardware: You’ll need a BleuIO USB dongle. Plug it into your computer’s USB port.
- Software: We’ll use JavaScript for this tutorial, running in a modern web browser that supports the Web Serial API. No additional software is required.
AT Commands Used
ATV1: Ensures verbose mode is enabled, meaning all command responses are returned in a human-readable format.AT+CENTRAL: Sets the dongle into Central mode, allowing it to scan and connect to other BLE devices.AT+FRSSI=-70: Filters out devices with an RSSI lower than -70 dBm, which helps to focus on devices within a closer range.AT+GAPSCAN=3: Initiates a scan for nearby BLE devices.
HTML Setup
The following HTML file provides a simple user interface with a “Scan” button that starts the BLE scanning process.
<!DOCTYPE html>
<html lang="en">
  <head>
    <meta charset="UTF-8" />
    <meta name="viewport" content="width=device-width, initial-scale=1.0" />
    <title>Look for Close Beacon</title>
    <style>
      body {
        text-align: center;
        margin: 200px auto;
        width: 800px;
        font-size: 20px;
      }
    </style>
  </head>
  <body>
    <button id="connect" style="font-size: 20px; width: 200px; height: 50px">
      Scan
    </button>
    <pre id="output"></pre>

    <script src="serial.js"></script>
  </body>
</html>
JavaScript Code: serial.js
This script, which is linked in the HTML file, manages the BLE scanning and RSSI filtering.
let port;
let reader;
let writer;
let buffer = '';
let ibeaconFound = false;
let scanIntervalId;
const connectButton = document.getElementById('connect');
const outputElement = document.getElementById('output');
connectButton.addEventListener('click', async () => {
try {
// Request a port and open a connection.
port = await navigator.serial.requestPort();
await port.open({ baudRate: 9600 });
// Start reading from the serial port.
reader = port.readable.getReader();
writer = port.writable.getWriter();
// Send initial setup commands
await writer.write(new TextEncoder().encode('ATV1\r'));
await delay(1000);
await writer.write(new TextEncoder().encode('AT+CENTRAL\r'));
await delay(1000);
await writer.write(new TextEncoder().encode('AT+FRSSI=-70\r'));
await delay(1000);
// Start the scanning process at 15-second intervals
startScanInterval();
// Read data from the device.
readLoop();
} catch (error) {
console.error('There was an error opening the serial port:', error);
}
});
function startScanInterval() {
scanIntervalId = setInterval(async () => {
ibeaconFound = false; // Reset the flag for each scan
await writer.write(new TextEncoder().encode('AT+GAPSCAN=3\r'));
// Wait 3 seconds to check if 'Close beacon' is found
setTimeout(() => {
if (ibeaconFound) {
outputElement.innerHTML =
'<div style="color: green; display: inline-block; margin-right: 8px;">●</div>Close beacon is within the range of 5 meters.<br>';
} else {
outputElement.innerHTML =
'<div style="color: red; display: inline-block; margin-right: 8px;">●</div>Close beacon is not within the range of 5 meters.<br>';
}
}, 3000);
}, 15000); // 15 seconds interval
}
async function readLoop() {
while (true) {
const { value, done } = await reader.read();
if (done) {
// Allow the serial port to be closed later.
reader.releaseLock();
break;
}
// Convert the data to a string and append it to the buffer.
buffer += new TextDecoder().decode(value);
// Split the buffer by line breaks to process each line separately.
let lines = buffer.split('\n');
buffer = lines.pop(); // Save the last incomplete line for the next read.
for (let line of lines) {
line = line.trim(); // Remove any extra whitespace
// Check if the line is a valid JSON string
if (line.startsWith('{') && line.endsWith('}')) {
try {
// Parse the JSON object.
let data = JSON.parse(line);
// Check if the object contains the 'name' property and if it's "Sheikh ibeacon".
if (data.S && data.name === 'Close beacon') {
ibeaconFound = true;
}
} catch (e) {
console.error('Error parsing JSON:', e, line);
}
} else {
// Log non-JSON lines for debugging or just ignore them.
console.log('Non-JSON line received:', line);
}
}
}
}
function delay(ms) {
return new Promise((resolve) => setTimeout(resolve, ms));
}
window.addEventListener('beforeunload', async () => {
// Stop the scanning interval when the window is closed or refreshed.
if (scanIntervalId) {
clearInterval(scanIntervalId);
}
// Close the port when the window is closed or refreshed.
if (reader) {
await reader.cancel();
reader.releaseLock();
}
if (writer) {
writer.releaseLock();
}
if (port) {
await port.close();
}
});
Code Explanation
- HTML Interface:
- The HTML file provides a simple user interface with a “Scan” button. When clicked, this button triggers the BLE scanning process.
- JavaScript Code:
- Initialization: We start by requesting access to the serial port and opening a connection to the BLE dongle. After setting up the port, we configure the dongle by sending the
ATV1,AT+CENTRAL, andAT+FRSSI=-70commands. These commands enable verbose mode, set the device to central mode, and filter out weak BLE signals (below -70 dBm), respectively. - Scan Interval: The
setIntervalfunction initiates a BLE scan every 15 seconds. TheAT+GAPSCAN=3command scans for nearby BLE devices for 3 seconds. - Device Detection: After each scan, we check if the specific BLE device named “Close beacon” is found. If it is, a green dot appears with a message indicating the device is within range. If not, a red dot with a message indicating the device is not within range is shown.
- Reading Data: The
readLoopfunction continuously reads data from the serial port. It checks for JSON-formatted responses from the dongle and looks for the device name in the scanned results. - Clean Up: We ensure that the scanning process stops and the serial port is closed when the user leaves the page or closes the window.
- Initialization: We start by requesting access to the serial port and opening a connection to the BLE dongle. After setting up the port, we configure the dongle by sending the
Setting Up RSSI Filtering for 5-Meter Range Detection
In this project, the goal was to detect if a specific BLE device, “Close Beacon,” is within approximately 5 meters of our BLE dongle. We achieved this by using the Received Signal Strength Indicator (RSSI), which helps us estimate the distance based on the strength of the received signal.
Understanding RSSI and Distance
RSSI is a measure of signal strength, with higher (less negative) values indicating a closer proximity to the BLE device. The relationship between RSSI and distance is governed by the following formula:
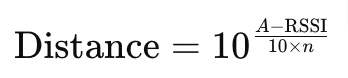
- A: RSSI at 1 meter (typically around -56 dBm for Bluetooth).
- n: Path-loss exponent (usually 2 for free space, 3 for indoor environments).
For a 5-meter distance, we calculated that an RSSI of -70 dBm is appropriate. Using the formula:
- A = -56 dBm
- n = 2 (assuming a free-space environment)

An RSSI of -70 dBm corresponds to approximately 5 meters, which is suitable for detecting if a device is within this range.
Practical Distance Adjustment
While theoretical calculations are useful, it’s also possible to perform a practical distance adjustment by placing the “Close Beacon” 5 meters away from the BLE dongle in a controlled environment, such as a room. You can then read the obtained RSSI value directly from the BleuIO dongle. This approach takes into account the real-world radio performance of both devices, providing a more accurate and practical RSSI value for your specific setup.
Output
 | 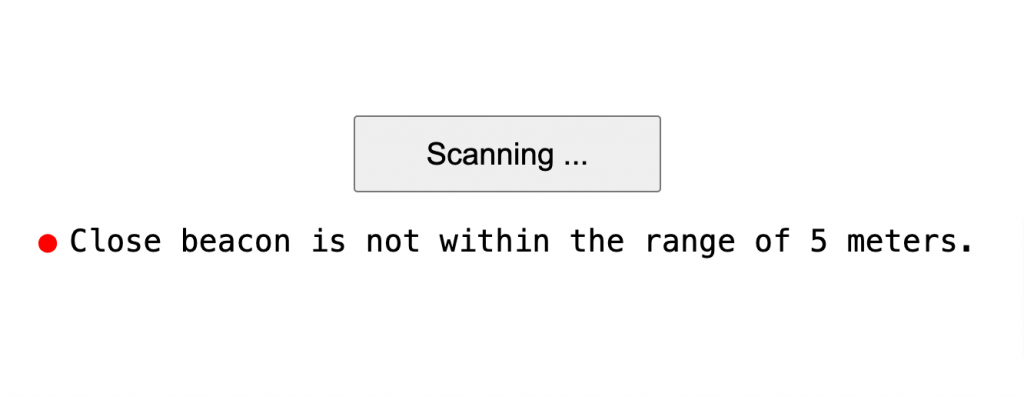 |
The BleuIO USB dongle makes it incredibly easy to develop and prototype BLE applications using AT commands. This project demonstrates how you can set up a BLE scanner with RSSI filtering to monitor the proximity of a specific device. Whether you’re developing a custom IoT solution, monitoring assets, or just exploring BLE technology, BleuIO provides a simple and effective toolset to get your projects up and running quickly.
By following this tutorial, you should now have a good understanding of how to use the BleuIO dongle to create a BLE application that scans for devices and filters them based on their signal strength.