Mobile BLE Development: Connect BleuIO to Your Mobile Device
August 30, 2024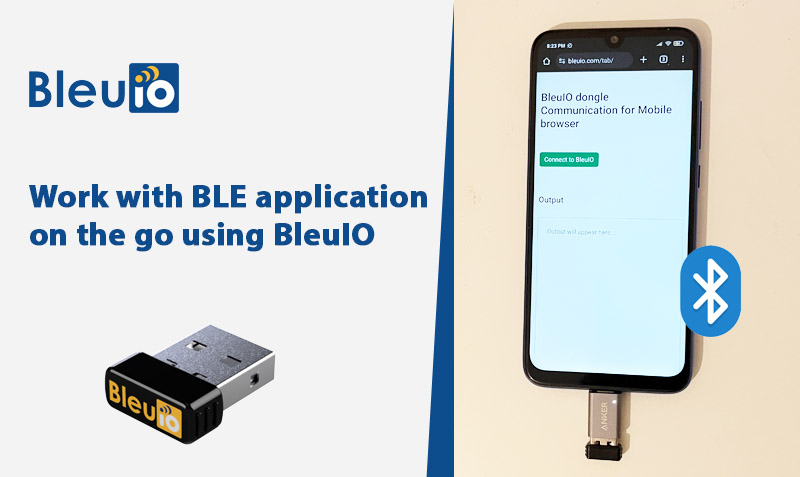
In today’s fast-paced world, flexibility and mobility in development are crucial. Whether you’re on the go or just want the convenience of working from your mobile device, having the ability to connect and interact with your development tools directly from your smartphone or tablet can be a game-changer. This article will guide you through a groundbreaking way to connect the BleuIO USB dongle to your mobile device using the Web Serial API. This tutorial will not only introduce you to the BleuIO dongle’s capabilities but also show you how to harness the power of BLE (Bluetooth Low Energy) on your mobile device with custom AT commands. By the end of this guide, you’ll be ready to run BLE scripts directly from your mobile browser, making BLE development more accessible and portable than ever.
Why This Matters
BleuIO is a versatile USB dongle that allows developers to easily add Bluetooth Low Energy (BLE) capabilities to their projects. Traditionally, connecting BLE devices to a mobile device required specialized apps or programming with platform-specific APIs. However, with the advent of the Web Serial API, it’s now possible to interact with BLE devices directly from a web browser, even on mobile devices. This means you can execute AT commands, scan for nearby BLE devices, and even build custom BLE applications right from your mobile browser.
This article is designed to help you leverage these capabilities, making BleuIO more accessible and useful whether you’re in the office, at home, or on the move. By following this tutorial, you’ll not only learn how to connect and communicate with BleuIO using your mobile device but also gain insight into how to integrate these features into your own BLE applications.
Getting Started: What You’ll Need
- BleuIO USB Dongle: The star of this tutorial, a compact USB device that adds BLE functionality to any device with a USB port.
- Mobile Device: A smartphone or tablet with a USB OTG (On-The-Go) adapter to connect the BleuIO dongle.
- Web Browser: A modern web browser that supports the Web Serial API. For this tutorial, we’ll focus on Google Chrome for Android.
- A Simple HTML/JavaScript Setup: We’ll walk through creating a basic web interface to send and receive AT commands from the BleuIO dongle.
Step 1: Setting Up Your Development Environment
Before diving into the code, let’s ensure your mobile device is ready. Here’s a quick checklist:
- Connect BleuIO to Your Mobile Device: Use a USB OTG adapter to connect the BleuIO dongle to your smartphone or tablet.
- Install a Compatible Browser: Ensure you have Google Chrome installed on your device. As of the time of writing, Chrome is one of the few mobile browsers that support the Web Serial API.
Step 2: Writing the Web Interface
Next, we’ll create a simple web interface that will allow you to connect to the BleuIO dongle, send AT commands, and display the responses. Below is the code we’ll use:
<!DOCTYPE html>
<html lang="en">
  <head>
    <meta charset="UTF-8" />
    <meta name="viewport" content="width=device-width, initial-scale=1.0" />
    <title>Web Serial API with BleuIO</title>
    <link
      href="https://cdn.jsdelivr.net/npm/bootstrap@5.3.3/dist/css/bootstrap.min.css"
      rel="stylesheet"
      integrity="sha384-QWTKZyjpPEjISv5WaRU9OFeRpok6YctnYmDr5pNlyT2bRjXh0JMhjY6hW+ALEwIH"
      crossorigin="anonymous"
    />

    <script type="module">
      import { serial as webSerialPolyfill } from 'web-serial-polyfill@1.0.15';
      // Use webSerialPolyfill as you would navigator.serial.
    </script>
  </head>
  <body>
    <div class="container mt-5">
      <h1>BleuIO dongle Communication for Mobile browser</h1>
      <br /><br />
      <div class="row">
        <div class="col-md-6">
          <button id="connect" class="btn btn-success">
            Connect to BleuIO
          </button>
          <button id="disconnect" class="btn btn-danger" style="display: none">
            Disconnect
          </button>
          <br /><br /><br /><br />
          <div id="command-section" style="display: none">
            Basic command <br />
            <button id="scanBtn" class="btn btn-primary">
              Scan for nearby BLE devices (AT+GAPSCAN=3)
            </button>
            <br />
            <br />
            Write your own AT commands
            <input
              type="text"
              id="inputData"
              class="form-control"
              placeholder="Write AT commands"
            /><br />
            <button id="send" class="btn btn-warning">Send</button>
          </div>
        </div>
        <div class="col-md-6">
          <h4>Output</h4>
          <br />
          <textarea
            id="output"
            style="height: 500px; width: 100%; border: 1px solid grey"
            class="rounded p-4"
            placeholder="Output will appear here..."
            readonly
          ></textarea>
        </div>
      </div>
    </div>

    <script type="module" crossorigin>
      import { serial as webSerialPolyfill } from 'https://cdn.jsdelivr.net/npm/web-serial-polyfill@1.0.15';
      var serial_module = null;
      if ('serial' in navigator) {
        serial_module = navigator.serial;
      } else {
        if ('usb' in navigator) {
          serial_module = webSerialPolyfill;
        }
      }
      let port;
      let reader;
      const connectButton = document.getElementById('connect');
      const disconnectButton = document.getElementById('disconnect');
      const sendButton = document.getElementById('send');
      const outputArea = document.getElementById('output');
      const inputField = document.getElementById('inputData');
      const commandSection = document.getElementById('command-section');

      connectButton.addEventListener('click', async () => {
        try {
          port = await serial_module.requestPort();
          await port.open({ baudRate: 9600 });

          reader = port.readable.getReader();

          // Hide connect button, show disconnect button and command section
          connectButton.style.display = 'none';
          disconnectButton.style.display = 'block';
          commandSection.style.display = 'block';

          while (true) {
            const { value, done } = await reader.read();
            if (done) {
              reader.releaseLock();
              break;
            }
            outputArea.value += new TextDecoder().decode(value);
          }
        } catch (error) {
          console.error('Failed to connect:', error);
          alert(
            'Failed to connect to the device. Please try again.',
            JSON.stringify(error)
          );
        }
      });

      disconnectButton.addEventListener('click', async () => {
        try {
          if (reader) {
            reader.cancel();
            reader = null;
          }
          if (port) {
            await port.close();
            port = null;
          }

          // Show connect button, hide disconnect button and command section
          connectButton.style.display = 'block';
          disconnectButton.style.display = 'none';
          commandSection.style.display = 'none';
        } catch (error) {
          console.error('Failed to disconnect:', error);
          alert('Failed to disconnect from the device. Please try again.');
        }
      });

      sendButton.addEventListener('click', async () => {
        outputArea.value = '';
        const writer = port.writable.getWriter();
        const dataToSend = inputField.value + '\r\n';
        const data = new TextEncoder().encode(dataToSend);
        await writer.write(data);
        writer.releaseLock();
      });
      document.getElementById('scanBtn').addEventListener('click', async () => {
        const writer = port.writable.getWriter();
        let dataToSend = 'AT+CENTRAL' + '\r\n';
        let data = new TextEncoder().encode(dataToSend);
        await writer.write(data);
        dataToSend = 'AT+GAPSCAN=3' + '\r\n';
        data = new TextEncoder().encode(dataToSend);
        await writer.write(data);
        writer.releaseLock();
      });
    </script>
  </body>
</html>
Step 3: Running the Script
Once your HTML file is ready, you can open it in your mobile browser. We have uploaded the script on github to try out.
https://smart-sensor-devices-ab.github.io/mobile_web_ble/
Here’s what will happen:
- Connect to BleuIO: Tap the “Connect to BleuIO” button to initiate a connection.
- Send Commands: Once connected, you can start sending AT commands or use the built-in “Scan for BLE Devices” button to see nearby BLE devices.
- View Output: The responses from the BleuIO dongle will appear in the output section on the right.
Step 4: Customizing and Expanding
This setup provides a solid foundation for more advanced BLE development on mobile devices. You can easily modify the script to add more AT commands or even build a full-fledged BLE application. Whether you want to control BLE devices, gather data, or create interactive applications, this setup offers flexibility and mobility.
Output:
With the BleuIO USB dongle and the Web Serial API, you can now bring BLE development to your mobile device, giving you the freedom to code, test, and interact with BLE devices wherever you are. This capability opens up new possibilities for developers who need to work on the go, providing a powerful toolset right in your pocket.
How do I read/write data between Windows and the mobile device?
Also, do i need to have 2 dongles?
Can it be one with 1 donngle?
Hi Donald,
The example in the project shows how to send data from a mobile device to a computer using a BleuIO USB dongle. The mobile application can easily connect to the dongle to send and receive data. You only need one dongle to connect to the computer for this setup.
If you want to send/receive data between two computers, then you’ll need to have a dongle connected to each computer. Here’s an example of how you can do that
https://www.bleuio.com/blog/transfer-files-wirelessly-over-the-bluetooth-low-energy-protocol-using-bleuio/