Building a BLE Real-Time macOS Menu Bar App Using BleuIO
January 12, 2025
In this tutorial, we will guide you through creating a BLE real-time macOS menu bar application using the BleuIO USB BLE dongle. BleuIO is an incredibly versatile tool that simplifies the development of BLE (Bluetooth Low Energy) applications, making it ideal for developers looking to build innovative projects with ease.
macOS menu bar applications offer a seamless way to monitor and interact with data in real time without requiring a dedicated application window. By leveraging the power of the BleuIO dongle, we can create a menu bar app that provides live updates on environmental metrics like temperature, humidity, and CO2 levels. This project demonstrates how BleuIO can be integrated into real-time applications, showcasing its potential for BLE-based projects.
Why is This Project Useful?
- Real-Time Updates: The app fetches BLE data at regular intervals and updates the macOS menu bar dynamically.
- Ease of Access: The macOS menu bar provides a non-intrusive interface, allowing users to access live data at a glance.
- Extensibility: This tutorial serves as a starting point for developers to explore more advanced BLE applications with BleuIO.
Requirements
To complete this project, you will need:
- BleuIO USB BLE Dongle: A powerful and easy-to-use BLE dongle for developing BLE applications.
- HibouAir – Air Quality Monitor: A BLE-enabled air quality monitor that broadcasts real-time environmental data such as temperature,pressure,voc,light, humidity, and CO2 levels.
- macOS System: A macOS device with Python 3 installed.
- Python Libraries:
rumps: For creating macOS menu bar applications.bleuio: For communicating with the BleuIO dongle.
How Real-Time Updates Are Handled
The app connects to the BleuIO dongle and scans for BLE advertisements air quality data from HibouAir. Using a timer, the app periodically initiates a scan every 2 minutes. The decoded data is then displayed directly in the macOS menu bar, providing real-time updates without user intervention.
Step-by-Step Guide
Step 1: Set Up the Environment
- Ensure you have a macOS system with Python 3 installed.
- Install the necessary dependencies using
pip:pip install rumps bleuio - Plug in your BleuIO USB dongle.
Step 2: Project Overview
Our goal is to:
- Connect to the BleuIO dongle.
- Put the dongle in Central Mode to scan for BLE advertisements.
- Scan for real time air quality data from HibouAir
- Decode the advertisement data to extract temperature, humidity, pressure, and CO2 levels.
- Update the macOS menu bar with the decoded data in real time.
Step 3: Writing the Code
Below is the Python script for the macOS menu bar app. This code handles the dongle initialization, data scanning, decoding, and menu updates.
import rumps
import time
import json
from datetime import datetime
from bleuio_lib.bleuio_funcs import BleuIO
boardID="220069"

# Function to decode advertisement data
def adv_data_decode(adv):
    try:
        pos = adv.find("5B0705")
        if pos == -1:
            raise ValueError("Invalid advertisement data: '5B0705' not found.")

        dt = datetime.now()
        current_ts = dt.strftime("%Y/%m/%d %H:%M:%S")

        # Temperature decoding
        temp_hex = int(adv[pos + 22:pos + 26][::-1], 16)  # Reversed bytes
        if temp_hex > 1000:
            temp_hex = (temp_hex - (65535 + 1)) / 10
        else:
            temp_hex = temp_hex / 10

        # Pressure decoding (convert from little-endian)
        pressure_bytes = bytes.fromhex(adv[pos + 18:pos + 22])
        pressure = int.from_bytes(pressure_bytes, byteorder='little') / 10

        # Humidity decoding (convert from little-endian)
        humidity_bytes = bytes.fromhex(adv[pos + 26:pos + 30])
        humidity = int.from_bytes(humidity_bytes, byteorder='little') / 10

        return {
            "boardID": adv[pos + 8:pos + 14],
            "pressure": pressure,
            "temp": temp_hex,
            "hum": humidity,
            "co2": int(adv[pos + 46:pos + 50], 16),
            "ts": current_ts,
        }
    except Exception as e:
        print(f"Error decoding advertisement data: {e}")
        return {}


# Callback function for scan results
def my_scan_callback(scan_input):
    try:
        scan_result = json.loads(scan_input[0])
        data = scan_result.get("data", "")

        decoded_data = adv_data_decode(data)

        # Update menu with decoded data
        app.update_menu(decoded_data)

    except Exception as e:
        print(f"Error parsing scan result: {e}")

# Callback function for events
def my_evt_callback(evt_input):
    cbTime = datetime.now()
    currentTime = cbTime.strftime("%H:%M:%S")
    print(f"\n\n[{currentTime}] Event: {evt_input}")

class AirQualityApp(rumps.App):
    def __init__(self):
        super(AirQualityApp, self).__init__("CO2 : 550")
        self.my_dongle = None  # Placeholder for the dongle object
        self.co2_item = rumps.MenuItem(title="CO2 : 550ppm", callback=lambda _: None)
        self.temp_item = rumps.MenuItem(title="Temperature: 25°C", callback=lambda _: None)
        self.hum_item = rumps.MenuItem(title="Humidity: 65 %rh", callback=lambda _: None)
        self.press_item = rumps.MenuItem(title="Pressure: 1000 mbar", callback=lambda _: None)

        self.menu = [
            self.co2_item,
            self.temp_item,
            self.hum_item,
            self.press_item,
            None  # Separator
        ]

        # Establish connection and start scanning on startup
        self.connect_dongle()
        self.start_periodic_scan()

    def connect_dongle(self):
        try:
            self.my_dongle = BleuIO()  # Initialize the dongle
            self.my_dongle.register_evt_cb(my_evt_callback)  # Register event callback
            self.my_dongle.register_scan_cb(my_scan_callback)  # Register scan callback
            print("Dongle connected successfully.")

            # Set the dongle to central mode
            response = self.my_dongle.at_central()
            print("Dongle is now in central mode.")

        except Exception as e:
            print(f"Error connecting to dongle: {e}")

    def scan(self, _=None):  # Added `_` to accept the timer argument
        try:
            # Start scanning for specific data
            response = self.my_dongle.at_findscandata(boardID, 3)
            print(f"Scan initiated. Response: {response.Rsp}")
        except Exception as e:
            print(f"Error during scan: {e}")

    def start_periodic_scan(self):
        try:
            rumps.timer(120)(self.scan)  # Run the scan method every 30 seconds
        except Exception as e:
            print(f"Error setting up periodic scan: {e}")

    def update_menu(self, decoded_data):
        try:
            self.title = f"CO2 : {decoded_data.get('co2', 'N/A')}ppm"  # Update app title
            self.co2_item.title = f"CO2 : {decoded_data.get('co2', 'N/A')}ppm"
            self.temp_item.title = f"Temperature: {decoded_data.get('temp', 'N/A')}°C"
            self.hum_item.title = f"Humidity: {decoded_data.get('hum', 'N/A')} %rh"
            self.press_item.title = f"Pressure: {decoded_data.get('pressure', 'N/A')} mbar"
        except Exception as e:
            print(f"Error updating menu: {e}")

if __name__ == "__main__":
    app = AirQualityApp()
    app.run()
Note : Make sure to change the BoardID to your HibouAir CO2 device on line 6
Step 4: Run the App
- Save the script as
bleuio.py. - Run the script using:
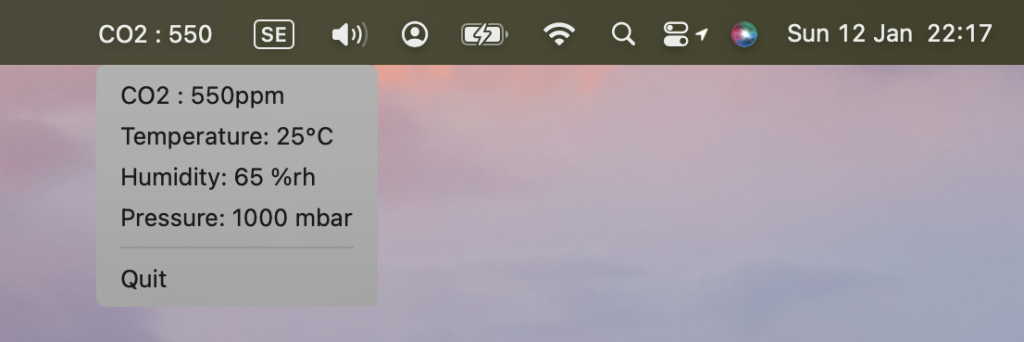
python bleuio.py - The app will appear in the macOS menu bar with latest CO2 value. Click the icon to view the live BLE data updates.
Output

Extending the Project
This project is a foundation for exploring the capabilities of BleuIO. You can extend it to:
- Monitor additional BLE devices.
- Implement alert notifications for specific data thresholds.
- Log the data to a file or send it to a cloud service for further analysis.
This tutorial demonstrates how to create a real-time macOS menu bar application using the BleuIO dongle. By following this guide, you’ll not only learn how to handle BLE data but also understand how to integrate it into user-friendly macOS applications. BleuIO opens up endless possibilities for BLE-based projects, and we’re excited to see what you create next!

