Using BleuIO with Angular & TypeScript via Web Serial API
February 12, 2025
In modern web development, Bluetooth Low Energy (BLE) integration is becoming increasingly important for IoT applications. With the Web Serial API, we can now directly communicate with hardware devices like BleuIO using just a browser, eliminating the need for native drivers or middleware.
In this tutorial, we will demonstrate how to use Angular 19 and TypeScript to communicate with a BleuIO USB Dongle via Web Serial API. We will build a simple web application that connects to BleuIO, sends AT commands, and displays responses in real time.
This approach is beneficial because:
- No additional backend services are required—everything runs directly in the browser.
- Simplicity—Web Serial API allows communication with serial devices in JavaScript/TypeScript without native code.
- Cross-platform compatibility—Works on any OS with Google Chrome or Microsoft Edge.
Why Use Angular & TypeScript?
Angular is a powerful framework for building scalable, maintainable, and modern web applications. TypeScript, which is the foundation of Angular, brings type safety and better tooling, making development smoother and reducing runtime errors.
By using Angular 19, we ensure that our application is built on the latest and most optimized framework version, taking advantage of standalone components and improved performance features.
Setting Up the Angular Project
To get started, ensure you have Node.js and Angular CLI installed.
Create an Angular Project
Run the following command to generate a new Angular 19 project:
new angular-bleuio --strict
cd angular-bleuio
Choose No for routing and CSS as the styling option.
add Bootstrap to styles.css:
@import url('https://cdn.jsdelivr.net/npm/bootstrap@5.3.0/dist/css/bootstrap.min.css');This ensures our application has a clean, professional UI.
Building the BleuIO Web Serial Connection
We will now implement the core functionality:
- Connect to BleuIO via Web Serial API.
- Send AT commands and receive responses.
- Display formatted responses using delimiters.
Creating the Angular Component
In src/app/app.component.ts, replace the contents with:
import { Component } from '@angular/core';
import { FormsModule } from '@angular/forms';

@Component({
  selector: 'app-root',
  standalone: true, //
  imports: [FormsModule],
  templateUrl: './app.component.html',
  styleUrls: ['./app.component.css'],
})
export class AppComponent {
  port: any | undefined;
  writer: WritableStreamDefaultWriter | undefined;
  reader: ReadableStreamDefaultReader | undefined;
  command: string = '';
  response: string = 'Not connected.';

  async connectToBleuIO() {
    try {
      if (!('serial' in navigator)) {
        this.response = 'Web Serial API not supported in this browser.';
        return;
      }

      this.port = await (navigator as any).serial.requestPort();
      await this.port.open({ baudRate: 115200 });

      this.response = 'Connected to BleuIO.';
      this.writer = this.port.writable?.getWriter();
      this.reader = this.port.readable?.getReader();

      this.readData();
    } catch (error) {
      console.error('Connection failed:', error);
      this.response = 'Failed to connect.';
    }
  }

  async sendCommand() {
    if (!this.port || !this.writer || !this.command) {
      this.response = 'Not connected or empty command.';
      return;
    }

    try {
      // Reset the response before sending a new command
      this.response = 'Waiting for response...';

      // Clear any old responses before sending new data
      if (this.reader) {
        await this.reader.cancel();
        this.reader.releaseLock();
        this.reader = this.port.readable?.getReader(); // Reinitialize reader
      }

      // Send the AT command
      const encoder = new TextEncoder();
      await this.writer.write(encoder.encode(this.command + '\r\n'));

      this.response = 'Command sent: ' + this.command;
      this.readData(); // Start reading the new response
    } catch (error) {
      console.error('Send error:', error);
      this.response = 'Error sending command.';
    }
  }

  async readData() {
    if (!this.reader) return;

    const decoder = new TextDecoder();
    let fullResponse = '';

    try {
      while (true) {
        const { value, done } = await this.reader.read();
        if (done) break;

        let textChunk = decoder.decode(value);
        fullResponse += textChunk; // Append new data to the response

        this.response = fullResponse
          .replace(/(\w)\.(\s[A-Z])/g, '$1.\n$2') // Add newline after full stops (but not inside numbers)
          .replace(
            /(BleuIO|Firmware Version|Peripheral role|Central role|Not Connected|Not Advertising)/g,
            '\n$1'
          ); // New line before keywords
      }
    } catch (error) {
      console.error('Read error:', error);
    }
  }
}
Creating the UI
Modify src/app/app.component.html:
<div class="container text-center mt-5">
  <h1 class="mb-4 text-primary">
    Angular & TypeScript: Connect to BleuIO via Serial port
  </h1>

  <!-- Connect Button -->
  <button class="btn btn-primary mb-3" (click)="connectToBleuIO()">
    Connect to BleuIO
  </button>

  <div class="input-group mb-3 w-50 mx-auto">
    <input
      type="text"
      [(ngModel)]="command"
      class="form-control"
      placeholder="Enter AT Command"
    />
    <button class="btn btn-success" (click)="sendCommand()">
      Send Command
    </button>
  </div>

  <h3 class="mt-4">Response:</h3>

  <div
    class="border p-3 w-75 mx-auto bg-light rounded shadow-sm"
    style="white-space: pre-line"
  >
    {{ response }}
  </div>
</div>
Update src/main.ts
Replace its contents with:
import { bootstrapApplication } from '@angular/platform-browser';
import { AppComponent } from './app/app.component';
import { importProvidersFrom } from '@angular/core';
import { FormsModule } from '@angular/forms';

bootstrapApplication(AppComponent, {
  providers: [importProvidersFrom(FormsModule)],
}).catch((err) => console.error(err));
Running the Project
Start the Angular app:
ng serveOpen Google Chrome and go to http://localhost:4200/.
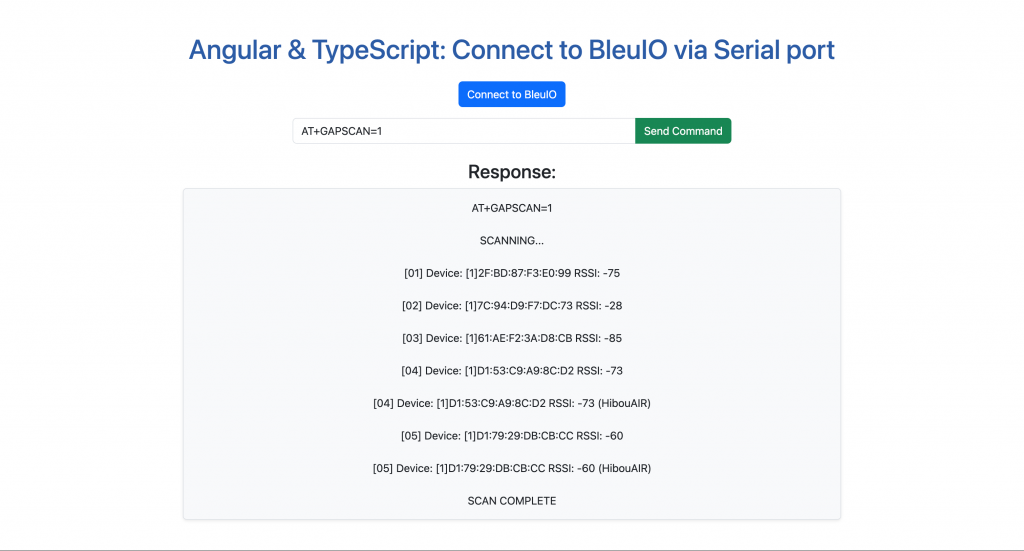
Test by clicking “Connect to BleuIO”, entering an AT command, and clicking “Send Command”.
Complete Source Code
Find the full source code on GitHub:
🔗 GitHub Repository
Output
Use Cases: Why This is Helpful
- This tutorial is beneficial for developers who:
- Want a simple, browser-based way to communicate with BleuIO.
- Need a cross-platform solution that works on Windows, macOS, and Linux.
- Are building IoT applications that require BLE communication.
- Want to use Angular & TypeScript for a scalable frontend solution.
This tutorial demonstrates how to use Angular 19, TypeScript, and the Web Serial API to communicate with BleuIO. The project is lightweight, scalable, and works entirely in the browser—perfect for IoT applications!